


Defender For Cloud - under the hood: Attack Path Analysis APA deep dive
Understand Attack Path Analysis and how it can be used to prioritise the most critical issues

Ever play connect-the-dots as a kid? Well, attackers do the same thing just with your cloud misconfigurations. 😬🎯 With Attack Path Analysis in Defender for Cloud, you can trace those attack paths before they do!
‼️) This blog is part of a Defender For Cloud "Under the hood series" where we explore the various features, benefits and considerations that come with implementing Defender For Cloud (and other CNAPPs). You don't need any prior experience just a willingness to learn and develop. I don't quite know when the series will end but I hope you enjoy.What are attack paths ?

To better understand the attack path analysis (APA) feature in defender for cloud you should understand what an attack path is and what it means for your security. An attack path is a potential entry point an attacker could use to get access to a resource or sensitive data. The attack path will then follow a series of pre required steps (lateral movement) that an attacker must take in order to be successful at exploiting the vulnerability or misconfiguration which will then unlock the door to access the desired resource or sensitive data.
What is Attack Path Analysis (APA)?
Attack Path Analysis (APA) uses a graph-based algorithm to analyse your cloud security posture, correlating with risk factors unique to your environment identifying exploitable entry points and attack paths that adversaries could use to compromise critical assets.
Since APA uses proprietary technology and algorithms including in Microsoft Defender for Cloud I can’t share the exact details. But based on experience and testing with Defender for Cloud, here’s what happens under the hood:
APA correlates security signals, potential threats, and common attacker techniques, then combines them with threat intelligence (such as newly discovered zero-day vulnerabilities). It cross-references this with risk factors unique to your environment using Microsoft’s security graph data. As Microsoft puts it: “Each customer sees their own unique attack paths based on their unique multicloud environment.”
To detect risks, APA relies on:
Cloud Infrastructure Entitlement Management (CIEM): Finds weakly configured IAM and machine identities.
Cloud Security Posture Management (CSPM): Identifies misconfigurations in multi-cloud and hybrid environments and prioritizes them based on risk.
AI Security Posture Management (AI-SPM): Detects AI resources that might be exposed such as those with AI grouting data exposed to the internet.
Data Security Posture Management (DSPM): Identifies which resources hold sensitive data.
Essentially, APA connects the dots between security gaps in your cloud setup, helping you stay ahead of threats using the power of cloud native application protection platforms (CNAPPs) which works best as a unified solution combining the above traditionally separate tools.
Exploring Defender For Cloud APA in depth
You’ll find attack paths in three different places in the Defender for Cloud portal on the overview page and dedicated tab as well as the Microsoft XDR portal (could change in the future). You’ll get the same level of information from all three places, for me personally I prefer to use the dedicated tab.


Inside the Defender for Cloud APA interface:
Once you click into attack path analysis within the definer for cloud portal there is a lot to unpack here… let’s dive in.

Top Header Section
At the top, you’ll find some standard functionality:
Learn More: Takes you to the documentation for this feature.
Feedback: You can provide feedback directly from the portal (and I encourage you to do so!). Improving the tool benefits everyone.
Download Attack Paths: Export the list for external reporting or to create detailed visualisations ( if your a power BI wiz).
Open Query: This feature, which I covered in my Defender for Cloud "Under the Hood": Resource Inventory Deep Dive blog, is based on Azure Resource Graph (ARG). Since the standard filters can be limiting, Open Query allows you to run queries at scale, manipulate the data as needed, and get precise results.
Middle Section
This section provides a quick snapshot of the number of attack paths in your environment—especially useful when you have many to track. It also includes:
Total Affected Resources: The number of resources impacted by attack paths e.g. those identified to be exposed.
Active Recommendations: Suggested fixes for identified issues more on that later.
Risk Level: Determined by analysing and correlating data from your environment and other external factors like threat intelligence.
Lower Section
This part gives a detailed breakdown of your attack paths, including:
Risk Level: Categorised as Not evaluated, Low, Medium, High, or Critical.
Entry Points: Weak spots attackers could exploit to gain an initial foothold and move laterally.
Target: The attack’s end goal, which could involve sensitive data or critical resources.
Environment: Specifies whether the affected resources are in AWS, GCP, or Azure, depending on what you’ve onboarded.
Risk Factors: Contextualised insights on key risks, in this scenario there are numerous risk factors that have contributed to the priority and severity of the attack path such as:
Critical Resource: Identified due to the device being marked as a critical resource within the organisation.
Sensitive Data: For example, personally identifiable information (PII) in a storage blob.
Internet Exposure: A resource intentionally exposed to the internet, making it easy to enumerate.
Weak Authorisation: Lack of authentication or permissions required to access a resource.

Under the hood how is the risk calculated? Defender for Cloud uses a context-aware risk-prioritization engine to calculate the risk level of each security recommendation. The risk level is determined by the risk factors of each resource, such as its configuration, network connections, and security posture. The risk level is calculated based on the potential impact of the security issue being breached, the categories of risk, and the attack path that the security issue is part of.Inside an example attack path:
let’s focus on the left hand side and explain some of the information available here.

Attack Path Overview:
First up, you’ll see the severity—in this case, it’s flagged as Critical based on risk factor analysis and attack vectors. Not great. The recommendation outlines the steps to fix the issue (we’ll get to that in a bit), and the environment shows whether this applies to Azure, AWS, or GCP, depending on what you’ve got onboarded.
The Description:
This section gives context on why this is flagged as an attack path. In my case, it reads:
"An Azure blob storage container is reachable from the internet and allows public read access without authorisation required. Azure blob storage container stores sensitive data."
Yeah… definitely not best practice. 🥲
Attack Story:
Here’s where we see how an attacker could take advantage of this vulnerability:
They can read data from the storage container without any authorisation.
If that wasn’t bad enough, they can also access sensitive data inside the container.
Not exactly ideal, right?
Resource Types:
This tells you which resources are affected. At a glance, you can see exactly what’s at risk—whether it’s X, Y, or both.
Risk Factors:
These are derived from contextualising your environment data and external factors like threat intelligence. As mentioned earlier, CNAPP (Cloud-Native Application Protection Platform) is at its best when all its features are working together as a unified solution. In other words, the more signals it has, the smarter it gets.
MITRE ATT&CK® Tactics:
Now, this is an interesting one. If you didn’t already know, Microsoft integrates the MITRE ATT&CK framework into its security products to map threats, attack techniques, and adversary behaviours. This helps Defender for Cloud provide better insights into attack paths and potential exploits.

Related MITRE ATT&CK tactics

Attack Path Findings and Recommendations
Taking a closer look at the attack path graph (which, by the way, is interactive 🤯), you get a visual breakdown of how your resource is exposed, vulnerable, or misconfigured.

Focused Attack Path Graph
Let’s say I want to dig deeper into my Blob container after all, it’s been flagged as Critical and contains sensitive data. But why?
Defender for Cloud has determined this using:
Data Security Posture Management (DSPM) – to check what’s stored inside the blob.
Cloud Security Posture Management (CSPM) – to flag misconfigurations, like allowing unauthorised access.
Since I uploaded sample PII data earlier, Defender for Cloud has correctly identified that:
The Blob container allows public access (bad).
It contains sensitive data (also bad).
What’s Inside?
From the Insights tab, I can take a sneak peek at what’s inside the blob and whether the data carries a sensitive label. This labelling is a Microsoft Purview Data Loss Prevention (DLP) feature, which helps classify and protect sensitive information.
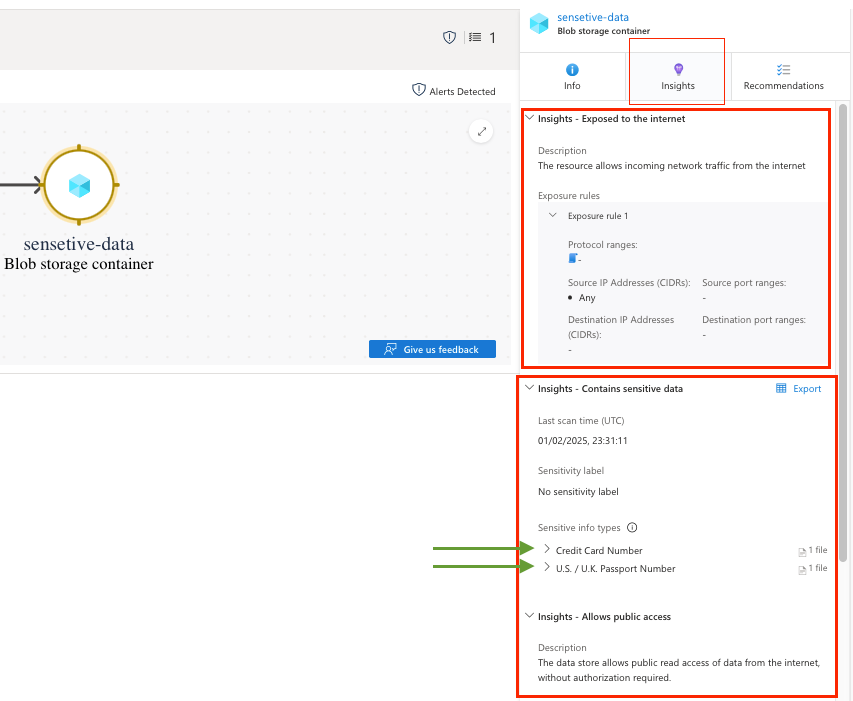
Clicking into the Sensitive Info Types, you can access the file name and the Blob hosting the data all directly from the UI via the public link (if it's exposed).

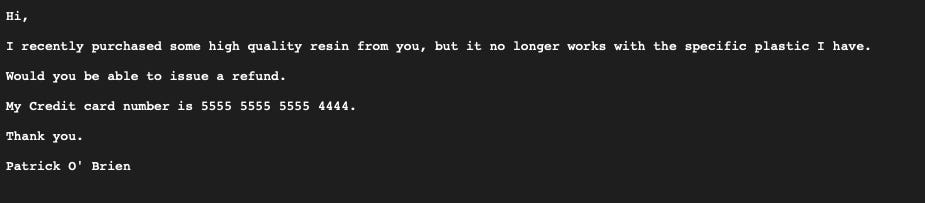
To verify, here’s the detected sample credit card number straight from the affected Blob:
Why is this important? Verifying that an attack path is truly exploitable is critical during an investigation to avoid false positives and focus on real security risks the data could be part of a public endpoint and required for a specific application therefore can then be marked as false positive.I want to bring your attention back to the Insights tab, where you’ll see this message:
“This resource was tagged as a critical resource for your organisation.”
Remember what I said earlier about data and risk contextualisation? Defender for Cloud correlates risk factors with other sources to determine the severity of an attack path. In this case, the resource has been tagged as "Critical", meaning it’s considered high priority for your organisation.
Now, here’s where Microsoft XDR comes into play. Defender for Cloud fully integrates with XDR, and one of its key features is Critical Asset Management.
I’ll go into more detail on this in a future blog, but at a high level, admins can automatically tag their most valuable resources—their "crown jewels" such as:
Sensitive Blob storage (like this one)
Domain controllers
User devices
This feature is brilliant because it lets you prioritise what truly matters, ensuring that your most important assets get the attention they deserve. This is the power of contextualised security Defender for Cloud and Microsoft XDR working together as a unified solution to give you real insights with real impact.


Remediation:
Now it’s time to hit “GO” on the remediation button! 🚀 By now, you’ve seen how the attack path feature helps prioritise critical misconfigurations. You’ve also explored how a unified security solution brings everything together correlating signals and data to give you end-to-end visibility and enable faster response.
With all this insight, it’s time to take action and secure your environment 🔧 recommendations will be covered in the blog to follow.
Reference:
Learn about Risk prioritisation
Learn about KQL - A book by Rod Trent Must Learn KQL
Defender For Cloud GitHub Labs
Defender for Cloud Feature requests
Defender for Cloud in the field show
Defender For Cloud Ninja training
Have blog ideas, want to engage on a topic, or explore collaboration? Let’s take it offline reach out on LinkedIn. I’d love to connect and continue the conversation!